The hardware enthusiast's corner
Message boards :
Number crunching :
The hardware enthusiast's corner
Message board moderation
| Author | Message |
|---|---|
 ServicEnginIC ServicEnginICSend message Joined: 24 Sep 10 Posts: 595 Credit: 12,249,686,510 RAC: 1,871,295 Level Scientific publications |
I think that a place to share computer hardware experiences/issues migth be useful at a number crunching platform like this. Please, feel free to share here experiences you consider interesting/useful for other colleagues. Let's classify crunchers generally into two large groups. One day something fails at hardware level in one of your rigs, and: -1) You take it to computer shop/workshop to get it serviced by specialized personnel -2) You open your rig and try to find and solve the problem by yourself I classify myself into group number 2 (unless failing rig is under warranty) I'll start by sharing a simple tip. This will "sound" familiar to many of you: For any reason, you stop for a while your usually 24/7 crunching rig. You return, switch it on again, and a loud (awful) noise starts to sound. You've got it: probably one (or more) fan(s) is (are) in the need to be replaced. Sometimes it is clear which fan is failing, other times you have to stop fans one by one until noise stops (You have found it!), and other times fan heats and sound stops by itself after some minutes... In that situation, I'm not happy until I catch failing fan and replace it. A noisy fan has a loss in cooling performance, and some valuable component(s) may overheat. And also it breaks something more invaluable: Quietness at Home:-) Fans could be classified into three large groups, depending in how the rotor shaft is mounted: -1) Sleeve bearing -2) Ball bearing -3) Magnetic/Flux bearing They are classified in ascending lifespan... and cost. I recommend not to try saving money in this component. In the event to choose between type 1 (sleeve bearing) or 2 (ball bearing), I'd recommend type 2. Or better type 3 if available. While type 1 fans are cheaper, type 2 and 3 usually feature greater reliability and longer lasting. Sometimes, in fan references there is some clue indicating their type. If not directly indicated, reference may contain some "S" for sleeve, or "B" for ball bearing. It can be seen in this photo.  Replacing a fan is usually a simple task, requiring only a screwdriver, cable ties, and cutting pliers. It does worth the job. For this operation, always shut down computer and disconnect it from power. Once disconnected, press briefly computer's "Power" button to release any remaining voltages at PSU. Also, touch some metallic part from chassis before touching any inside component. This will prevent damages due to electrostatic discharges. Then, take note/photo of air flux direction in damaged fan, unscrew it and disconnect cable from its socket, replace by new fan taking care to keep original air flux direction, and connect it to fan socket. Finally, take fan cables away from air path and arrange them conveniently by means of cable ties. For hardware enthusiasts, I'll finish recommending this PappaLitto's thread: https://www.gpugrid.net/forum_thread.php?id=5006 |
|
ServicEnginIC Send message Joined: 24 Sep 10 Posts: 595 Credit: 12,249,686,510 RAC: 1,871,295 Level Scientific publications |
Another tip regarding fans topic, and their frequently associated heatsinks: It is advisable to maintain them from time to time, to release stacked dust, fibers, and pet's hair. Not doing this will cause a progressive worsening in heat dissipation, and thus a gradual tempereture rising in whole system. For this task I have three different tools: -1) A 20 mm width common painter brush -2) A hair dye brush. My wife gave it to me, and I quickly found its utility... -3) A mini vacuum-cleaner 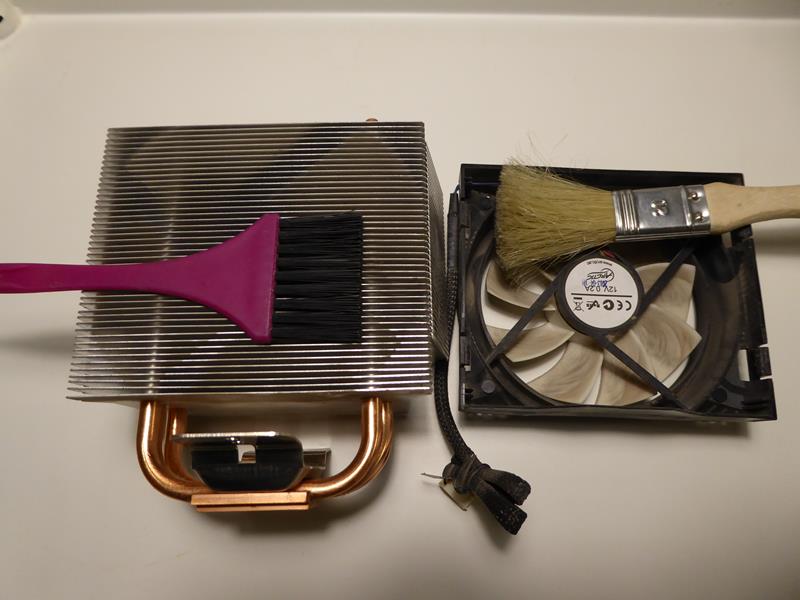 For cleaning heatsink fins, and gaps in between, hair dye brush is the most useful tool I've ever used. I can recommend it. Painter brush's bristles are not rigid enough to enter gaps between heatsink fins easily. Hair dye brush does it. You will undestand what I say taking a look to this photo: 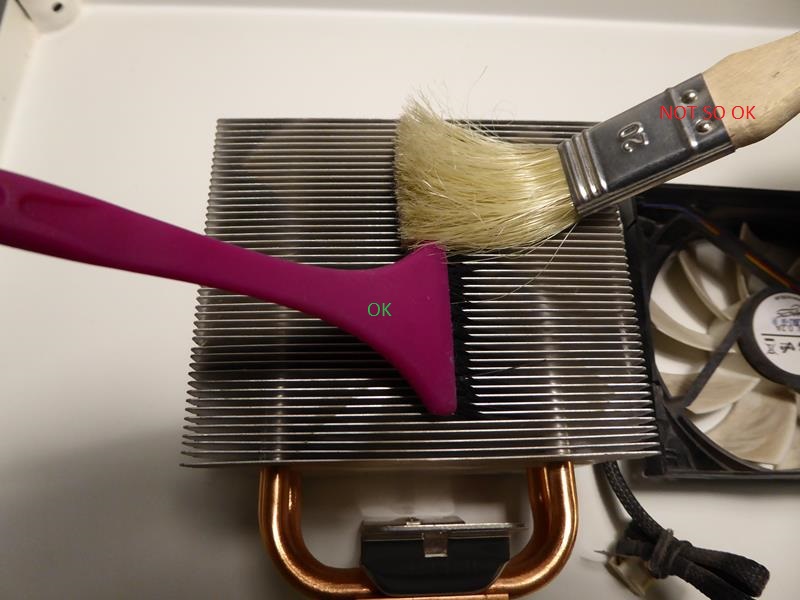 However, painter brush is a very convenient tool to clean fan blades, flexible and smooth enough to do the job properly: 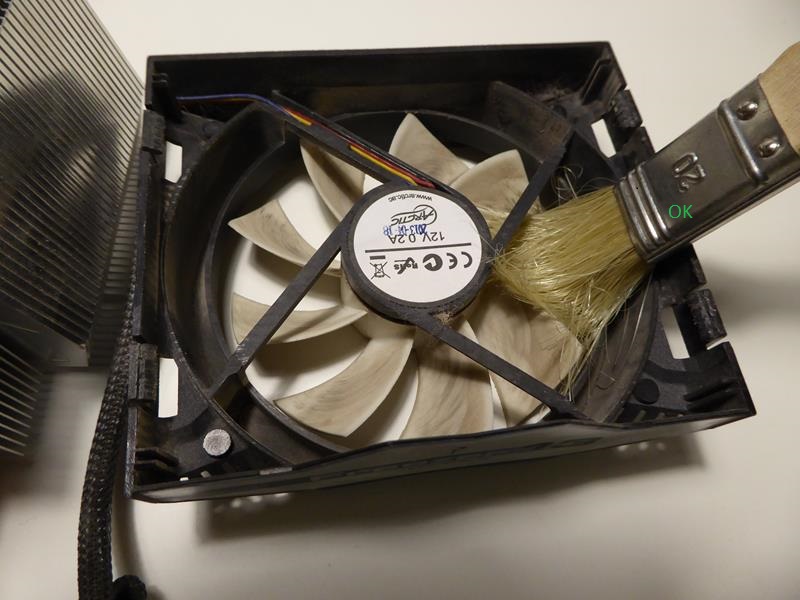 If after cleaning the system you start to hear a loud (awful) noise... Oh, oh, please, refer to first post in this thread... |
|
ServicEnginIC Send message Joined: 24 Sep 10 Posts: 595 Credit: 12,249,686,510 RAC: 1,871,295 Level Scientific publications |
Regarding heat dissipation, laptops should be considered as an apart subgroup. Normally laptops are manufactured prioritizing other guidelines than easy-to-maintain one. Here is a picture of a common laptop hardware distribution: 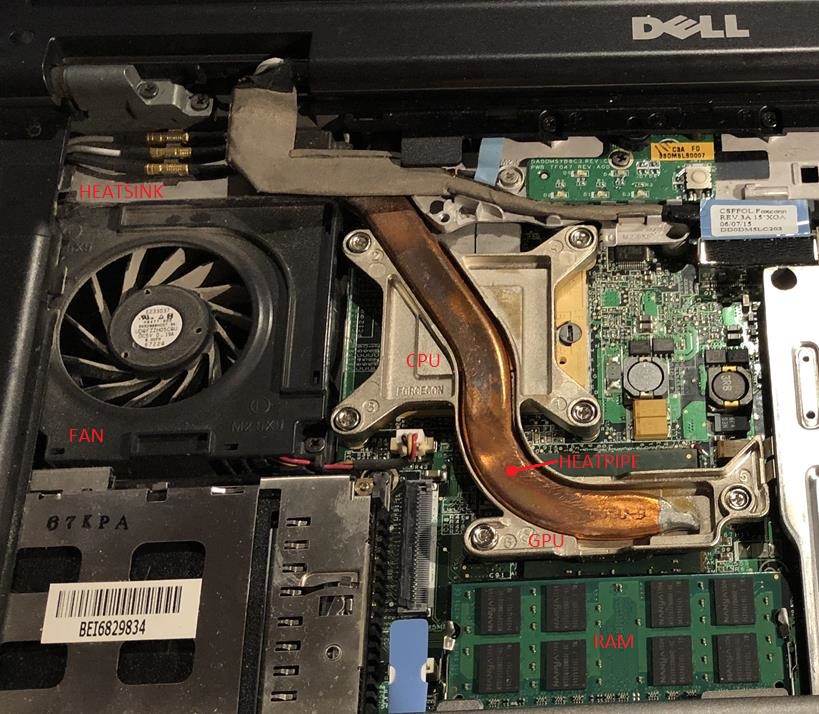 For space reasons, laptop's heatsink usually is very compact, and it has to dissipate heat coming through heatpipe from CPU and GPU, with the help of forced air impulsed by system fan. Working laptops get warm, becoming irresistible for any surrounding pet... And here is what can be found if you manage to dismount the fan: 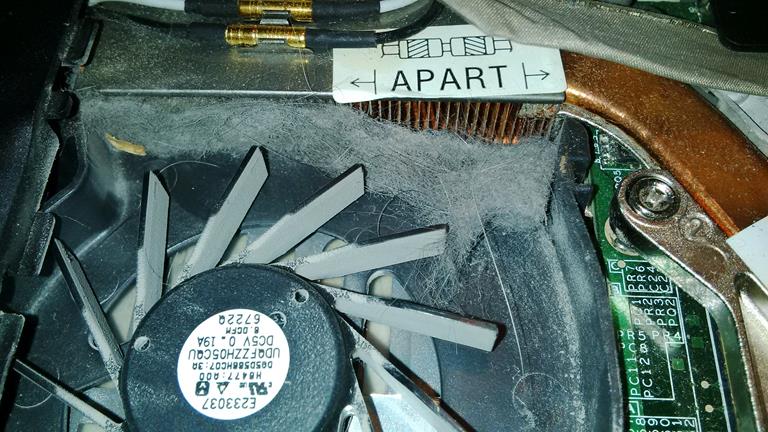 In this situation, heat is not efficiently dissipated, and the whole laptop may overheat. GPU and CPU, usually the most power consuming components, become hot spots inside, and in worst case may fail due to overheating. Some advice if crunching in laptops: - Try to monitorize temperatures in some way, permanently or at least when laptop's fan becomes louder than usual. - Set BOINC Manager preference for "Use at most 50 % of the CPUs". - Please, never lye a working laptop over soft surfaces like blankets, towels, cushions... This will restrict air circulation and cause overheating. - If there is luck enough for the laptop to survive manufacturer's warranty, consider cleaning heatsink from time to time. But I recognize that in most cases it is an arduous task! 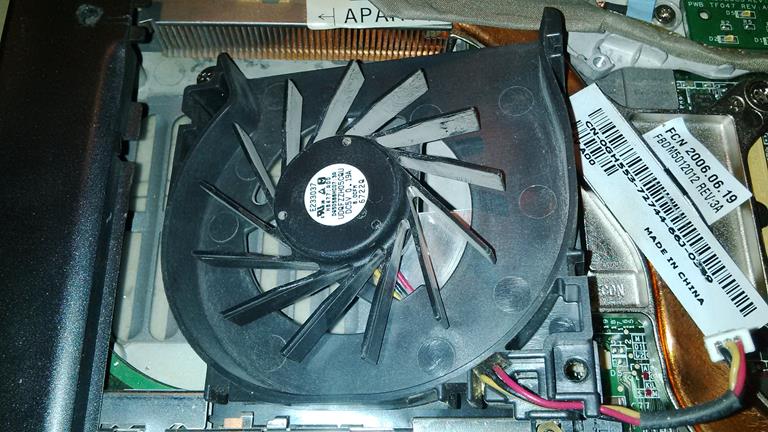 |
|
Send message Joined: 12 Jul 17 Posts: 404 Credit: 17,408,899,587 RAC: 0 Level Scientific publications |
I use XPOWER to blow the dust off my computers: https://www.amazon.com/gp/product/B01BI4UQK0/ref=ppx_yo_dt_b_asin_title_o06_s00?ie=UTF8&psc=1 
|
|
Send message Joined: 3 Sep 13 Posts: 53 Credit: 1,533,531,731 RAC: 0 Level Scientific publications |
Electric leaf blower for the win! https://www.youtube.com/watch?v=l0ohF6zthOQ Team USA forum | Team USA page Join us and #crunchforcures. We are now also folding:join team ID 236370! |
|
Send message Joined: 13 Dec 17 Posts: 1424 Credit: 9,189,946,190 RAC: 56,952 Level Scientific publications |
|
|
ServicEnginIC Send message Joined: 24 Sep 10 Posts: 595 Credit: 12,249,686,510 RAC: 1,871,295 Level Scientific publications |
I use XPOWER to blow the dust off my computers: Nice tool! Blowing those ways, no doubt, is more efficient to blast dust away than vacuum cleaner! But some considerations are to be taken in mind: - It is advisable to immobilize fans blades in some way before blowing. If not, fans may result damaged by overspinning. I broke more than one fan (but less than three) until I realized this... - Dust inside computer before blowing, is outside all arround after... It is not recommended to do it indoors. - Be careful of blowing near flat cables, since them are prone to act as boat sails and get damaged. - Keep theese tools away from children when not in use. - And please, be careful of using this method near asthmatic persons and armed wives for security reasons ;-) |
|
Send message Joined: 4 Aug 14 Posts: 266 Credit: 2,219,935,054 RAC: 0 Level Scientific publications |
A point to consider when using"Blower" devices is Electro Static Discharge. Ensure the device is NOT made of PVC/PET based plastics. Otherwise you risk the destruction of your electrical equipment through Electro-Static Discharge. There are a number of ESD safe Blowers available, but tend to be more expensive due to the plastics used. One example here: https://www.amazon.com/Canless-System-Hurricane-ESD-Safe-Replacement/dp/B00CJHGLFK |
|
ServicEnginIC Send message Joined: 24 Sep 10 Posts: 595 Credit: 12,249,686,510 RAC: 1,871,295 Level Scientific publications |
A point to consider when using"Blower" devices is Electro Static Discharge. Thank you very much for this remark. I take note of it. Another point to consider in special cases of high humidity environments if using compressed air cans or "zero residue" contact cleaners: Pressurized containers cause a chilling effect when the content expands. If components temperature drop below dewpoint, humidity will arise on them due to condensation. Please, let an extra waiting time after treatment for this humidity completely evaporate. |
|
ServicEnginIC Send message Joined: 24 Sep 10 Posts: 595 Credit: 12,249,686,510 RAC: 1,871,295 Level Scientific publications |
Another relatively common situation, mainly in veteran rigs (like mine ones): You stop your usually 24/7 crunching rig for a preventive hardware maintenance, or it suddenly stops due to a power outage. When you start the system again, it stops with a message indicating some data corruption - memory checksum failed. What's happened? When system is connected to the mains, PSU will permanently deliver a +5VSB voltage, even if system is switched off. This voltage feeds the volatile memory chip storing BIOS setup, real-time clock, and system start related electronics. When system is not connected to the mains, there is still a reduced part of the mainboard maintained by a battery, usually a 3V CR2032 button one. This battery maintains energized the real-time clock and BIOS setup memory chip. If battery becomes exhausted, real-time clock will stop, and memory data will probably get corrupted. Solution to this problem is very easy: Replacing exhausted battery by a new one. To do this I use the following tools: -1) A flat head mini screwdriver -2) A fine point CD marking pen 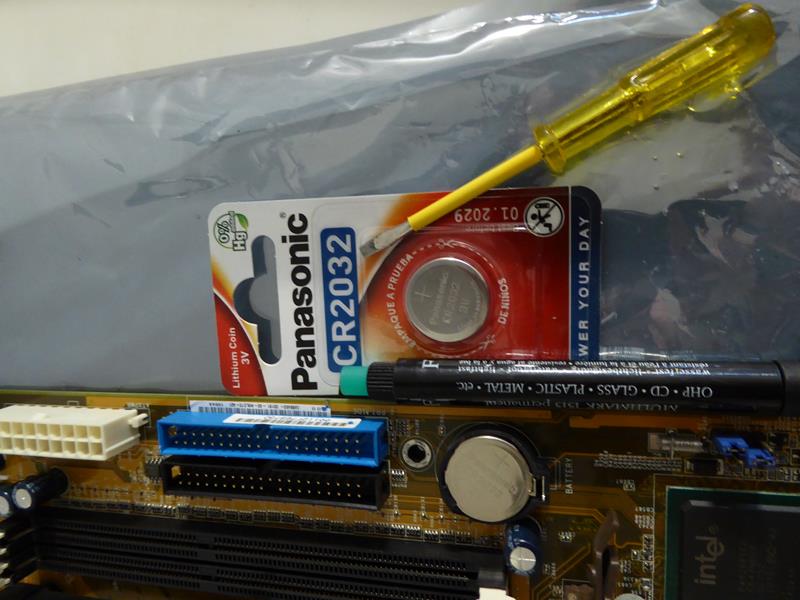 Disconnect system from power and briefly press Start button. This will discharge any voltage remaining at PSU. Locate backup battery at mainboard and take note/photo of original +/- polarity in its socket. Unpack new battery and annotate current month/year over it on its "+" side with CD marking pen. Doing this, You will prevent confusing old an new batteries, and it will serve as "maintenance logbook". Press carefully with screwdriver the old battery's retention latch while maintaining your other hand's thumb over the battery. Battery sometimes may bounce, as bottom terminal acts as a spring. 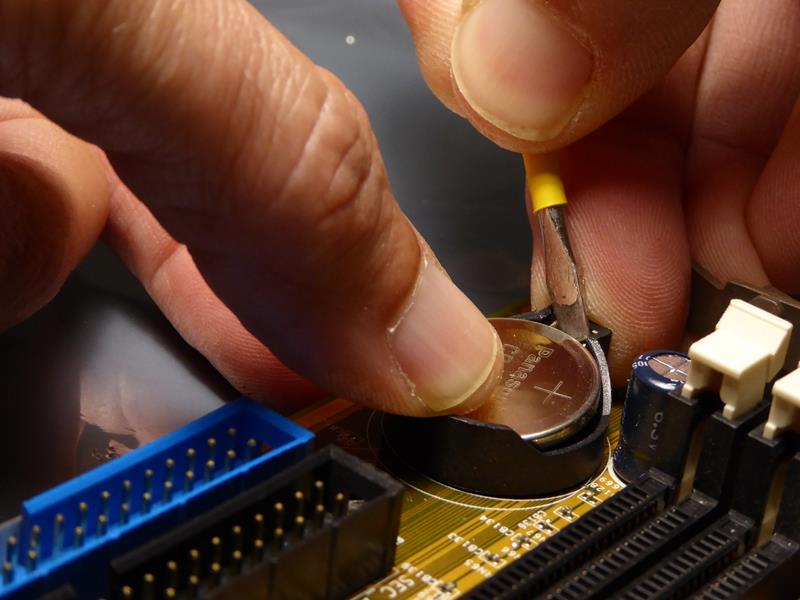 When battery is lifted, grasp it and take away. Set new battery on the socket respecting original polarity, and press it until retention latch clicks in place. 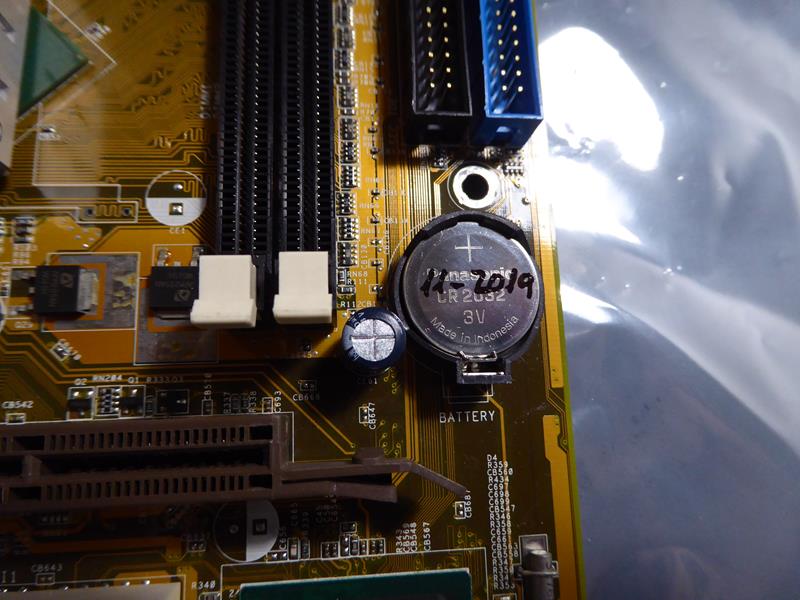 Reconnect power, start the system, enter BIOS setup, reconfigure parameters and date/time, and exit saving changes. |
|
ServicEnginIC Send message Joined: 24 Sep 10 Posts: 595 Credit: 12,249,686,510 RAC: 1,871,295 Level Scientific publications |
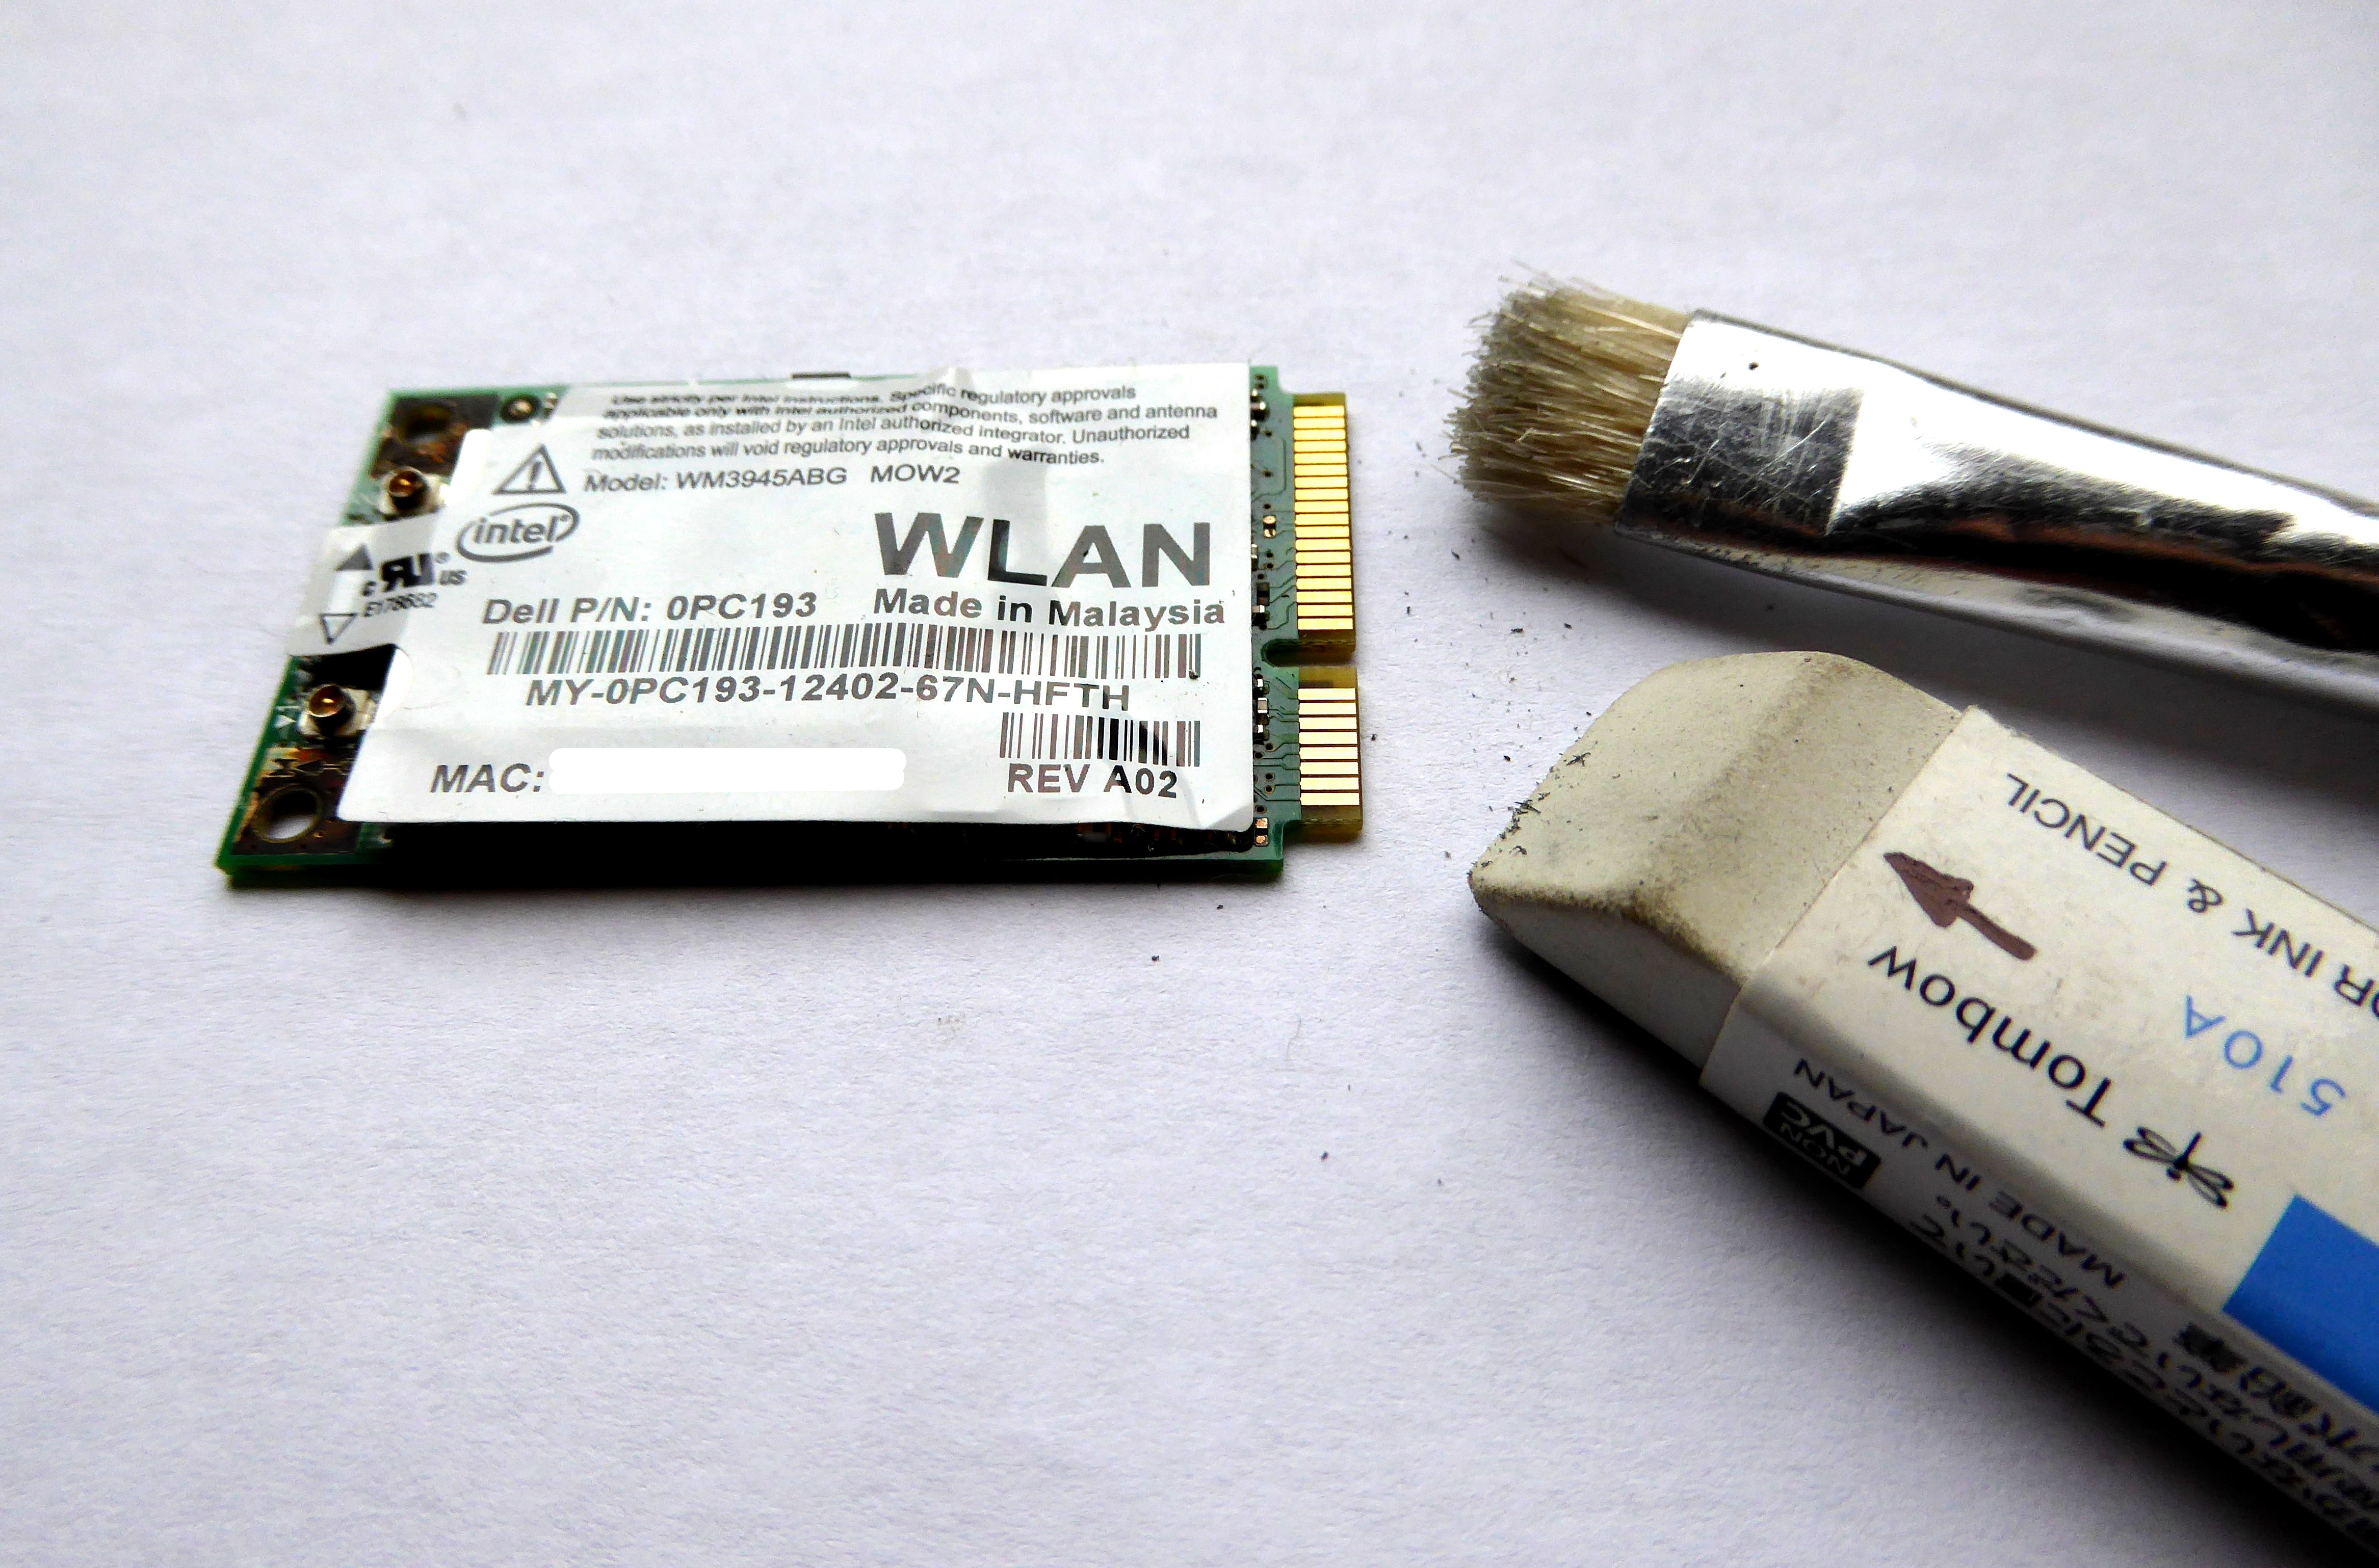
A true case more to share: Yesterday I left a laptop normally processing a MilkyWay@home CPU task. OS: Ubuntu Linux. Today, WU was finished but not reported by BOINC Manager. Entering system configuration, I got a message about it was not installed any WLAN adapter. But yes, it is installed! (Unless it has gone to a party overnight...) Definitively it is installed, and I can prove it. 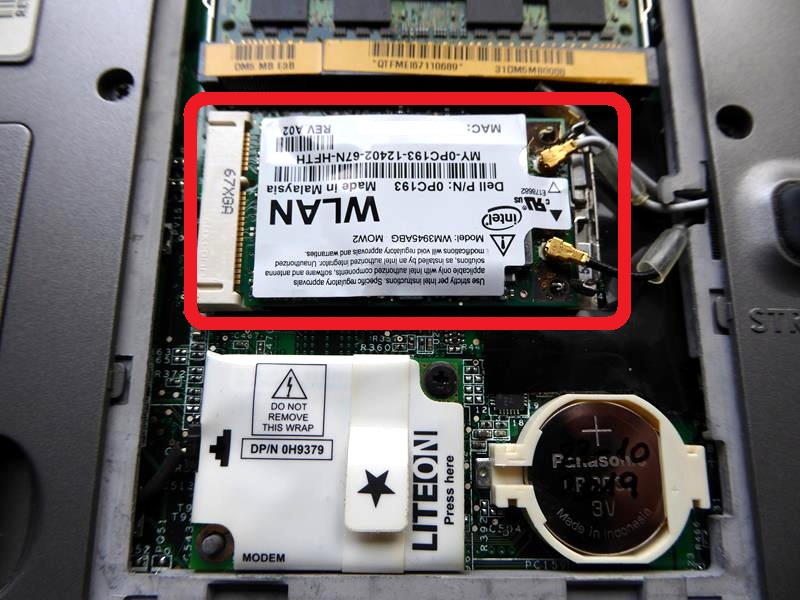 It is the one remarked in red in above image... This is a typical case of bad electric contacts between a component and its socket. Now my laptop is normally working again, the stalled task was reported, and a new one was downloaded and is in process. What was the solution? I extracted card from its socket, treated contacts, reinserted it, and it returned to work. For this, I used a technical drawing's rubber for pencil and small brush. I've gotten a pencil rubber not too soft, not too hard in a thecnical drawing shop. This rubber has an ink side too, but it is not advisable to use it in delicate contacts, as them might became scratched. Taking a careful look to following image you would be able to distinguish between narrower side of contacts (already treated) and broader side (not treated yet): http://www.servicenginic.com/Boinc/GPUGrid/Forum/WLAN_02.JPG Other typical problems caused by bad electrical contacts: Symptom: Component not being recognized (as present case was) Remedy: Extract component, clean contacts and reinsert. Symptom: A GPU normally working fine starts to fail tasks intermitently with no apparent reason. Remedy: Extract GPU and memory DIMMs, clean contacts and reinsert. Symptom: There is no image at system start, or starting even stops with some combination of loud beeps. Remedy: Extract GPU and memory DIMMs, clean contacts and reinsert. Symptom: System intermitently stops with blue screens, or restarts with no apparent reason. It may be caused by some intermitent RAM memory corruption. Remedy: Extract memory DIMMs, clean contacts and reinsert. PLEASE, PAY ATTENTION - All those components are electrostatic sensitive. Lay them over an antistatic surface. Those silver shining bags containing mainboards or graphics cards are suitable for this. - Allways switch off computer, disconnect from mains, and ensure no residual voltages are present (I.E. some led is still lit in mainboard). Usually, you can prevent this by pressing computer's start button briefly once it is disconnected (I.E. all leds will immediately extinguish) - Touch some metallic part of computer's case to discharge you from static charges before touching any inside component. |
|
Send message Joined: 4 Aug 14 Posts: 266 Credit: 2,219,935,054 RAC: 0 Level Scientific publications |
Fantastic, detail description of troubleshooting and repairing. I like the idea of the pencil rubber to clean the contacts. - Allways switch off computer, disconnect from mains, and ensure no residual voltages are present Touch some metallic part of computer's case to discharge you from static charges before touching any inside component. The only thing different I would do (assuming building power and cabling integrity is in good order): Turn off power at mains and leave power cord plugged in the wall. The earth connector on the power lead will allow for static discharge to be earthed to the building earth when you touch the case. Touching the case to discharge static electricity will not work as well without the plug in the wall. I have been Electrocuted by mains power when working on computer internals. The computer power supply was faulty and passing 240v out the 12v connectors (was investigating why the machine did not start). The building RCD saved me that day. Never make assumptions when working with power and always err on the side of safety. |
|
ServicEnginIC Send message Joined: 24 Sep 10 Posts: 595 Credit: 12,249,686,510 RAC: 1,871,295 Level Scientific publications |
The only thing different I would do (assuming building power and cabling integrity is in good order): You're right again in your aproach, rod4x4. Touching isolated chassis will equilibrate potentials between operator and computer ground, but not necessarily with surrounding environment. Many PSUs have a power switch. This switch (if working properly) disconnects Live and Neutral electric terminals (the ones bringing power), but Earth (protective) terminal continuity is maintained. Leaving power cord connected and PSU switched off increases sucurity of electronic components against electrostatic discharges. In the other hand, it increases risk for operators... as you have experienced by yourself. Life is a balance. A lower risk (*) home-made approach could consist of using an specially constructed power cable with Earth terminal only connected. I've marked mine with EO! (Earth Only!) It would look as follows: 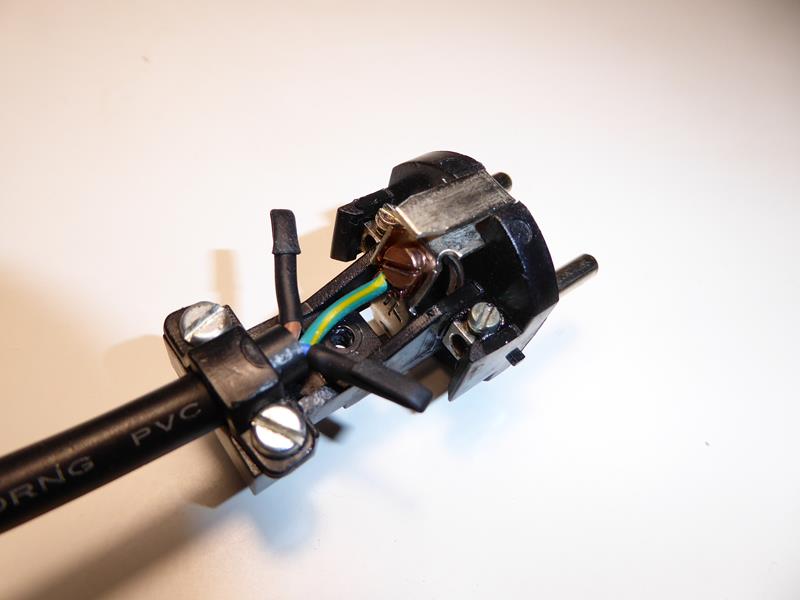 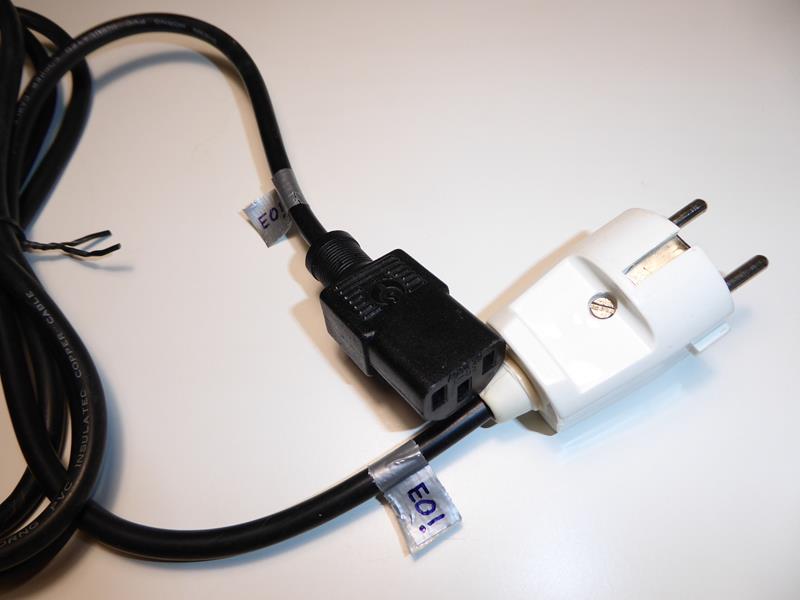 (*) Note: Never believe "zero risk" solutions. They don't exist. Some reasons that could cause this last approach to fail: - Power socket's Earth terminal connection defective - Building's Earth installation itself defective - Confusing tricked power cord with a regular one (Mark it clearly, please!) - Thunderstorm passing by - Any combination of Murphy's Laws taken from N in N... |
|
Send message Joined: 10 Nov 13 Posts: 101 Credit: 15,776,211,122 RAC: 121 Level Scientific publications |
I would recommend using an Anti-Static ESD grounding mat kit with a wrist strap and the proper grounding connection to the wall outlet. These are much better and safer for your equipment and yourself. It will also protect your work surface from damage. Here is a link to a fairly inexpensive one for the UK or EU. It doesn't have a full metal wrist strap however it would be adequate for most uses. https://pcvalet.co.uk/Buy/Anti_Static-ESD-Grounding-Earth-Mat-Kit%2C-500-x-400mm-%2F-UK-or-EU |
|
ServicEnginIC Send message Joined: 24 Sep 10 Posts: 595 Credit: 12,249,686,510 RAC: 1,871,295 Level Scientific publications |
I would recommend using an Anti-Static ESD grounding mat kit with a wrist strap and the proper grounding connection to the wall outlet. Thank you for your kind advice. I find the solution proposed excelent for working at workshop. I also would recommend it. It combines maximum security for both electronics and operators. But I personally find it somehow uncomfortable for working in the field. So one ends up developing some (not so advisable) alternative strategies... |
|
Send message Joined: 10 Nov 13 Posts: 101 Credit: 15,776,211,122 RAC: 121 Level Scientific publications |
I have a portable ESD field service kit. The mat folds and fits into a pouch along with the other items. The kit also fits into my laptop bag. It is similar to this one. https://www.tequipment.net/Prostat/PPK-646/General-Accessories/ This one is a bit more expensive so you may need to shop around for a better price. |
|
ServicEnginIC Send message Joined: 24 Sep 10 Posts: 595 Credit: 12,249,686,510 RAC: 1,871,295 Level Scientific publications |
Choosing the right Power Supply Unit (PSU). Or how a few minutes of thinking can save a lot of money and wasted energy. Hypothetically: I am designing a self made computer, and I choose the most powerful PSU I can afford. Right?... Not necessarily! I must choose the most efficient PSU I can afford, according to computer global charasteristics. This will save money in my electric bill and heat emitted to environment. (Please, revert terms, if you prefer) Let's imagine a practical example: One system is consuming 800 effective Watts, but it is demanding 1000 Watts from AC power outlet. This 20% of lacking is wasted power, and therefore this particular PSU is being 80% efficient. Whatever we can do to increase this efficciency, is well done. Two main considerations: -1) Try to choose an 80% or better efficiency certified PSU. You'll soon amortize the extra inversion in your power bill. -2) Try to accomodate the PSU maximum rated power to about double the one demanded by your particular system. Explanation: -1) Please, take a look to following table:  It is taken from Cooler Master PSUs manufacturer webpage. Picture shows an increasing efficiency PSU classification. The more efficient, the more fine tuned and quality must be electronics, larger copper sections, optimized Power Factor Correction (PFC) circuitry... and usually it means a more expensive final product. But as already said, it is going to self-amortize with time. -2) And taken from the same manufacturer webpage (*), a typical efficiency curve representation. 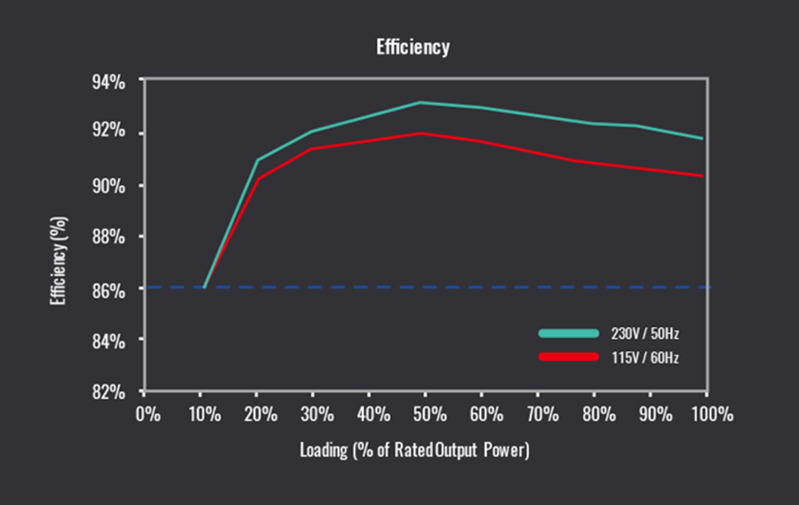 Typically, a PSU is peaking its maximum efficiency when it is delivering about half its maximum rated power. It can be seen by watching the Efficiency-Load curve. But yes, you have deduced right: Efficiency decays drastically at low loadings. In few words: If I select a 1500 Watts PSU to feed a 150 Watts low power consumption system, in some way I'll be wasting my inversion! At following link is featured an application form to calculate maximum power demanded by a system. https://www.coolermaster.com/power-supply-calculator/ This is calculated for all components consuming their maximum power concurrently. This is not an usual situation (unless you are processing ACEMD3:-) For example: For a calculated maximum power of 400 Watts, I would choose a 750 Watts PSU. This would make PSU working at its maximum efficiency, and even some margin would left for future hardware upgrades. (*) https://www.coolermaster.com/catalog/power-supplies/v-series/v850-gold/#overview |
|
ServicEnginIC Send message Joined: 24 Sep 10 Posts: 595 Credit: 12,249,686,510 RAC: 1,871,295 Level Scientific publications |
A totally or partially defective PSU may cause a wide variety of problems at affected computer: - System stopped and not responding at all to 'Power on' button - System starting and switching off in few seconds in an endless loop - System intermitently switching off or rebooting itself - Applications failing intermitently, specially high power demanding ones - System overheating if PSU fan fails - Motherboard or peripheral components breakage in severe cases PSU delivers several voltages to electrically feed computer's motherboard and peripherals. Taken from the manual of a Gigabyte motherboard, voltages and signals coming from PSU are as follows: 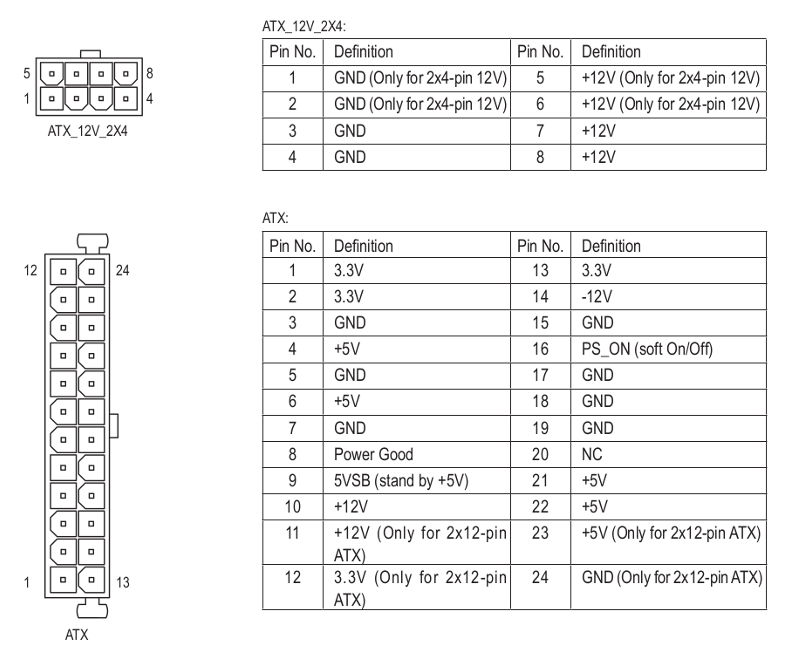 Taken from an Aerocool modular PSU, Connectors functions and shapes are as follows: 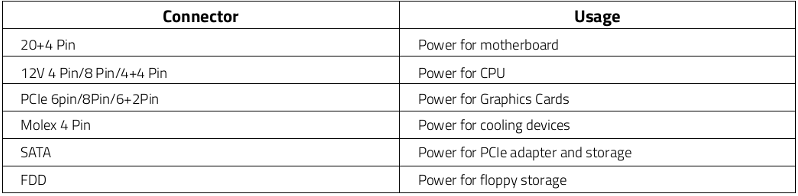 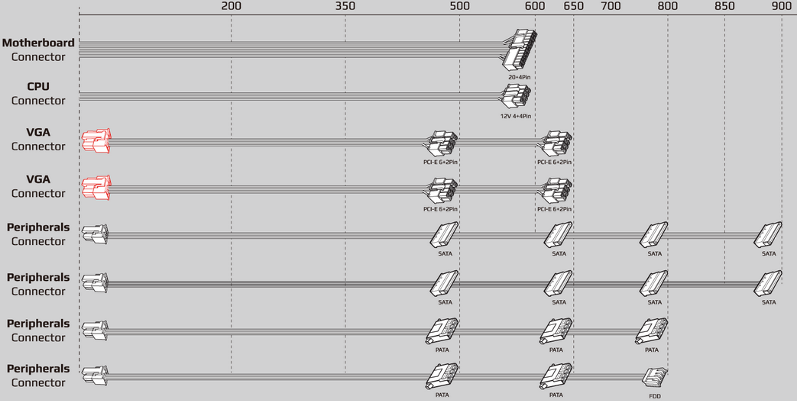 Given a certain PSU, every voltage has its associated maximum rated current and power. Taken from the same Aerocool PSU, a typical specifications label is as follows: 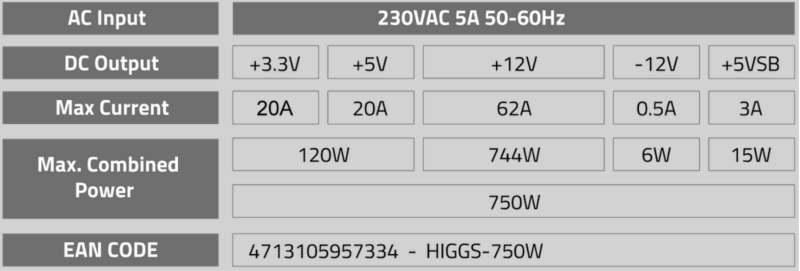 Replacing a PSU is more laborious than difficult. The steps: -1) Switch computer off, and disconnect PSU from power outlet. -2) Wait some minutes for PSU capacitors to discharge, or force it by pressing briefly computer's 'Power on' button. -3) Take note/photo of all the previous PSU connections: Motherboard, CPU, Hard disk(s), Optical unit(s), Graphics card(s), Peripherals, cooling devices... -4) Disconnect all those connectors. For some of them it will be necessary to press some fixing latch while pulling up. -5) Check all cables coming from PSU to be free. Cut carefully fixing ties if exist. -6) Unscrew PSU fixing screws, normally four of them placed in the same PSU's face than AC power connector. -7) Extract replaced PSU from its position, being careful for not to hit other computer components. For this, sometimes it will be necessary to extract other components as CPU cooler, optical unit, graphics card... if they block old PSU extraction and/or the insertion of the new PSU. -8) Insert new PSU in place, and fix it with its screws. For this, see final tip (*) -9) Reconnect all connectors previously listed in step (3). Be careful to double check full insertion for all connectors. Some of them must be pushed until fixing latch clicks in final position. Specially motherboard's 20+4 pins connector may be hard to insert. If possible, try to support at motherboard's back while pushing, for not to overstress it. -10) Arrange all cables by means of cable ties to convert the original cable mess into a more air-flux-friendly combination. -11) Test the system for a correct start up. For this first time, it is advisable to enter BIOS setup and check in Motherboard's System Monitor for all voltages being into specifications. -12) Replace covers (if any), reinstall system at its usual placement, and that's all. (*) Tip: GND rail delivers return for the addition of all voltage rails currents. PSU's GND rail is directly connected to its metallic chassis and to electrical protective earth terminal. Also Motherboard's GND is connected to all fixing holes on it, and from them to computer's chassis. The better electrical contact between PSU and computer's chassis, the less the voltage drop will be due to current circulation. For example, a contact resistance as low as 0,01Ω causes a voltage drop of 0,4V at a circulating current of 40A. 40A is about the current demanded to +12V rail by two GTX 1080 Ti or RTX 2080 Ti cards. If contact resistance is increased, also increases the chance to cause problems: overheating, burnt contacts, Intermitent computer errors, intermitent system rebooting... Something as simple as selecting the best PSU's fixing screws, may help to decrease electrical resistance between PSU and computer chassis, and help a bit to conduct returning current. The best ones are the stepped backhead screws shown at leftmost of following picture. Varnished (rightmost) screws are probably more beautiful, but varnish may worsen conductivity. 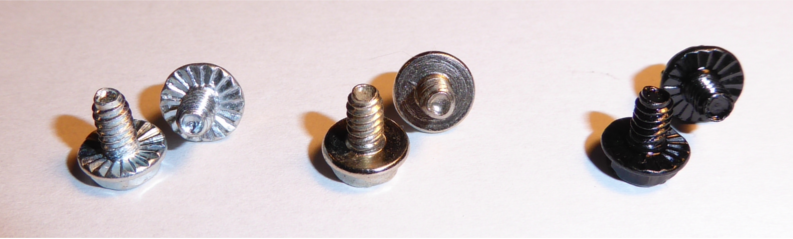 |
|
Send message Joined: 4 Aug 14 Posts: 266 Credit: 2,219,935,054 RAC: 0 Level Scientific publications |
Great post! Nice tip about the fixing screws, now I have to go and check all my fixing screws... |
|
Retvari Zoltan Send message Joined: 20 Jan 09 Posts: 2380 Credit: 16,897,957,044 RAC: 0 Level Scientific publications |
When replacing modular PSUs: Keep in mind that the PSU end of the modular connectors are *NOT* standardized! You have to carefully compare the PSU end pin-out of the old and the new PSU (especially when they came from different manufacturers), and if there's any difference between them then you must remove the old cables also (not just the PSU). It is advised to remove the old cables anyway, as their contact resistance grows over time due to corrosion. The branding of the PSU and the actual manufacturer of the product is not the same thing. So you can buy the same brand and the PSU end pin-out still could be different. A good source of info about PSUs: https://www.jonnyguru.com/ |

©2026 Universitat Pompeu Fabra